One of the most common questions I still receive is: “What WiFi adapter should I use for pentesting?” Over the last 13 years, I have tested a very wide range of adapters, the good, the bad and some ugly. In this post, I will walk through my 2025 recommendations, discuss the modes that matter for pentesting, and explain how to get your adapter operational under Kali Linux.
Standard Adapter Features
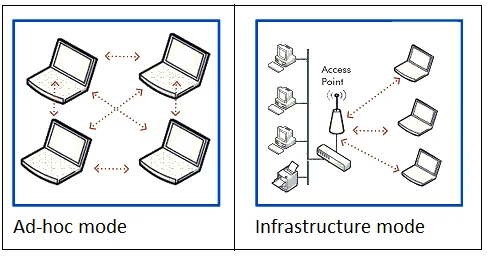
Under normal usage, wireless adapters typically operate in only one or two basic modes that allow them to connect to an infrastructure network (an access point) or a peer-to-peer network such as wireless tethering. These modes are rarely sufficient for security testing, where significantly more control over the radio is required.
These standard modes include:
- Managed
- Ad-Hoc / Mesh
There are many additional modes within 802.11, but for general users this list is adequate.
Modes Used by Pentesters
Pentesters rely on several additional operational modes, many of which are typically found in wireless routers and access points rather than consumer WiFi adapters. The two most relevant to security testing are:
- Master
- Monitor
Master mode allows an adapter to behave as an access point. Monitor mode, however, is the mode of choice for offensive security work due to its ability to passively capture and inject frames without standard firmware restrictions.
Monitor Mode
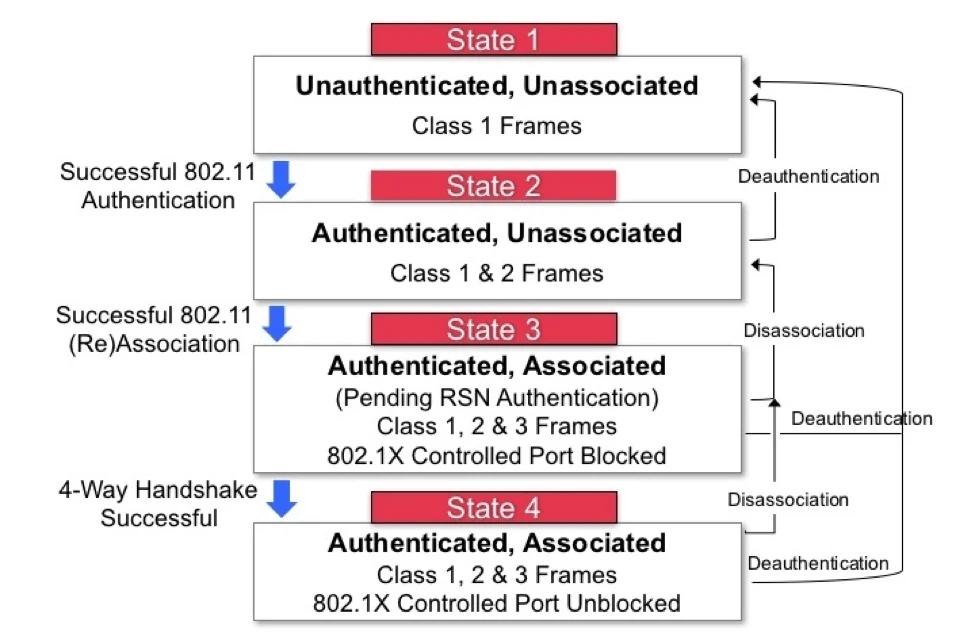
Firmware restrictions normally dictate which frames a device may send or receive. For example, when scanning for WiFi networks, a device should only send Probe Requests and listen for Beacon and Probe Responses intended for its own MAC. In standard operation, the firmware prevents the adapter from seeing frames destined for other devices.
Similarly, a device should not be permitted to send Association frames without first receiving a valid Authentication frame. The 802.11 state machine, shown below, illustrates permitted frame classes at each stage of the connection process.
Now, on to the part you likely came here for: adapter recommendations and practical setup guidance.
Adapter Recommendations
Rather than reinvent the wheel, this is an excellent, actively maintained reference list:
https://github.com/morrownr/USB-WiFi/blob/main/home/Recommended_Adapters_for_Kali_Linux.md
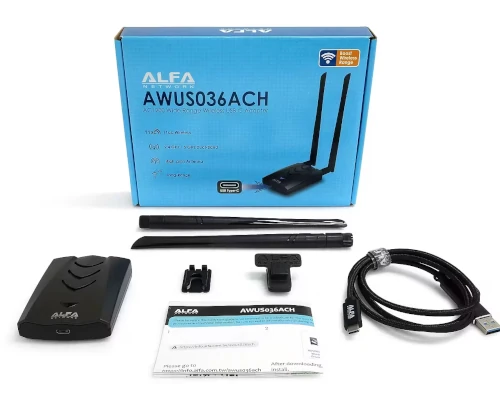
For my own work, I currently use and recommend the Alfa Networks AWUS036ACH, which supports all modes needed for professional WiFi pentesting.
Product link:
https://www.amazon.com.au/Alfa-AWUS036ACH-Dual-Adaptor-AC1200/dp/B00VEEBOPG/
Installing the Driver (Kali Linux)
This adapter requires a custom driver, but modern Kali systems make installation straightforward:
sudo apt install -y linux-headers-$(uname -r) realtek-rtl88xxau-dkms
sudo modprobe 88XXau
This installs kernel headers (required to build the driver) and the Realtek drivers for the 88XXau chipset. modprobe loads the driver immediately; otherwise, a reboot would be required. Some users report instability, but in my experience the AWUS036ACH has been consistent.
Limitations
The primary drawback is lack of 6 GHz support. As most tooling still requires patched drivers for 6 GHz operation, this is not a major practical limitation for 2025.
I also tested the AWUS036AXML, which does support 6 GHz and is plug-and-play, meaning no custom drivers required, assuming USB 3.0 is enabled. However, I went through four of these adapters (mt7912au chipset) within a single year. All failed within 12 months, so I cannot recommend it at this time.
Enabling Monitor Mode in Kali Linux
To freely send and receive arbitrary frames, monitor mode is required. Before enabling it, ensure NetworkManager does not interfere with your interface. Assuming your adapter appears as wlan0:
sudo nmcli dev set wlan0 managed no
This disables NetworkManager control of the interface.
Next, bring the interface down to change its mode:
sudo ifconfig wlan0 down
Enable monitor mode:
sudo iwconfig wlan0 mode monitor
Bring the interface back up:
sudo ifconfig wlan0 up
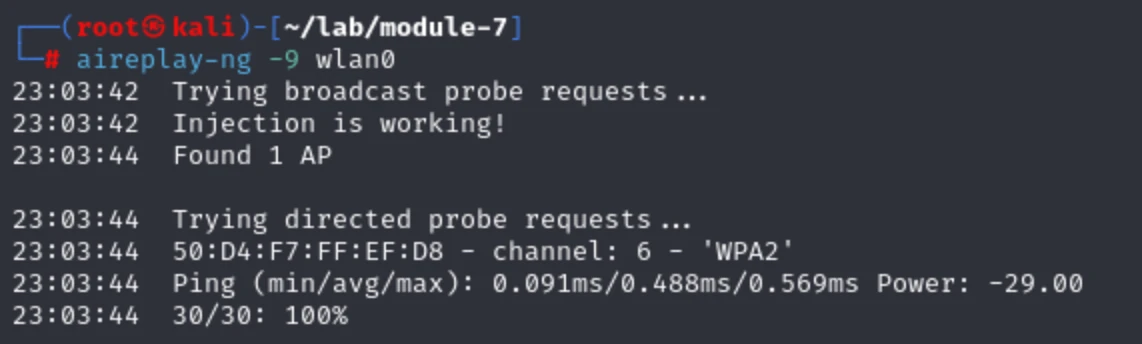
Now confirm injection capability:
sudo aireplay-ng -9 wlan0
23:03:42  Trying broadcast probe requests...
23:03:42  Injection is working!
23:03:44  Found 1 AP

23:03:44  Trying directed probe requests...
23:03:44  50:D4:F7:FF:EF:D8 - channel: 6 - 'WPA2'
23:03:44  Ping (min/avg/max): 0.091ms/0.488ms/0.569ms Power: -29.00
23:03:44  30/30: 100%
Looking to Build a Solid Foundation in WiFi Pentesting?
If you’re not ready for a full advanced program but want a structured, practical entry point into WiFi Penetration Testing, I did a recording of a live training a session specifically designed for newcomers and those looking to up skill in the WiFi space:
WiFi: Novice to Professional
https://go.thexero.co.uk/wifi-pro
This practical course is the same material presented at conferences and security consultancies all over the world, teaching modern day WiFi penetration testing and is fully hands on in self-hosted virtual environment, and includes the following areas:
- Wi-Fi fundamentals
- Adapter requirements and recommendations
- Managing Wi-Fi interfaces
- WiFi channels
- Hacking Personal WPA
- WPA rogue access points
- Hacking Enterprise WPA
- Hacking Personal WPA3
- Hacking Enterprise WPA
- Protected Management Frames (PMF)
- Clientless attacks on WPA2
- Introduction to wireless pivots
It is structured to help you quickly become effective with the essential skills and tooling required for real world wireless penetration testing, without the added barrier