TL;DR
Even perfectly deployed enterprise Wi-Fi networks using EAP-TLS aren’t immune to exploitation. This post walks through how attackers can exploit trusted devices outside their secure perimeter using wireless pivots, rogue access points, and client misconfigurations. From capturing probe requests to triggering NetNTLM hashes with Responder, this is your full guide to advanced Wi-Fi attack chains.
Introduction
This post is going to be on wireless pivots. For those not familiar with the term, a pivot is like changing your tactics, to achieve the same desired outcome.
On any given day on a wireless pentest, you will likely come across a variety of different network types, a BYOD SSID that uses an iPSK (Individual Pre-Shared Key), and maybe an WPA enterprise network. Within enterprise WiFi, there are multiple authentication methods that can be supported, from those using traditional credentials, to those using a client and server certificates. In this post, we are going to focus on the hardest of these (EAP-TLS), with the absolute PERFECT deployment that uses a trusted internal CA, client and server certificates.
But first, lets do a quick recap of how WiFi actually works. Lets take a quick look at the different stages to connect to a network.
Wi-Fi 101: A Quick Refresher
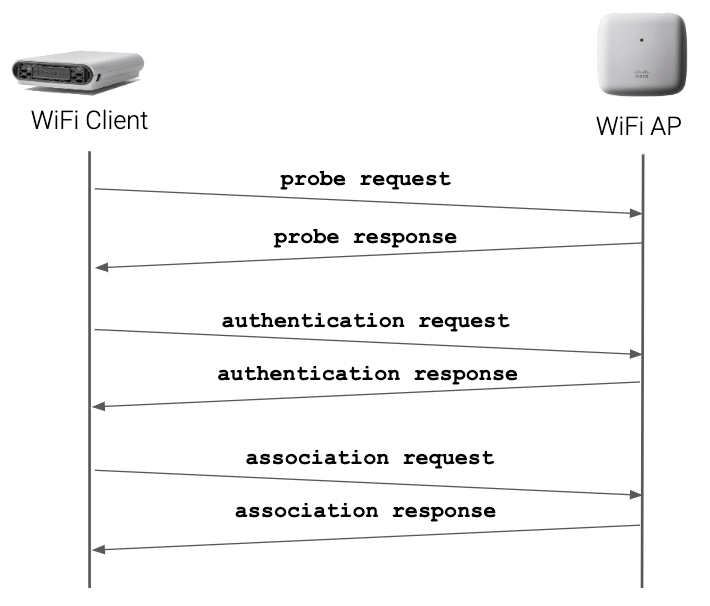
- What happens first, is the WiFi Client (Supplicant) sends Probe requests looking for a previously known network.
- The AP with that network responds to the STA.
- The STA then begins the authentication and get a response.
- And lastly the association request and response are transmitted.
There are a couple more steps, but hopefully you get the idea, the STA initiates everything.
Now, with WPA networks, there is another step, the actual authentication with the network. First, lets break down exactly how EAP-TLS works and why it is the most secure thing we have right now.
EAP-TLS: The Security Best Practice
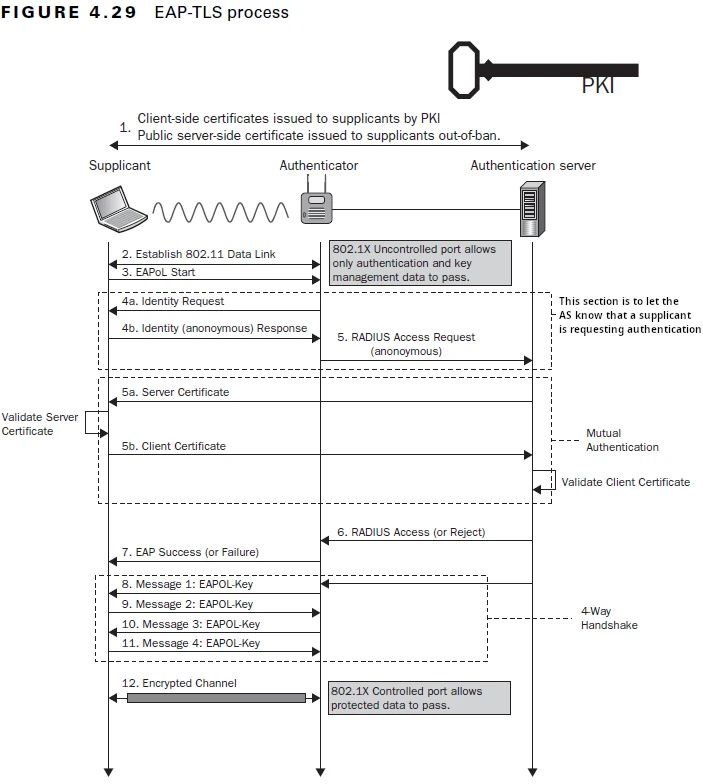
The first thing that happens after the 802.11 Data Link is established is the STA will request EAPoL Start (802.1X).
To start this process, the AP requests an identity from the STA and passes this to the backend Authentication (RADIUS) server in an access request. Once this step is complete, the mutual authentication happens.
Lets break down how this public and private key authentication works.
Firstly, both the STA and Authentication server possess a private key, and a public key. As the name suggests, the private key is designed to remain private and is never transmitted. The public key, is designed to be public and is shared with each system that the private key will be used to access. The public key is used to verify that a specific private key was used.
The first step, is that the backend authentication server proves it has the private key, by signing or encrypting the TLS handshake. The client verifies this by using the associated public key to verify that the signing key used matches the key it has on record.
If successful, the STA then signs that same message with its’ private key and sends it to the backend authentication server. Just like before, but in reverse now. The Authentication server uses the public key for the STA, to verify the data was signed using the relevant key.
If both stages are verified and complete successfully, the authentication server then sends a RADIUS Access to the Authenticator (AP).
The Authenticator then sends an EAP Success to the STA and completes the required 4-way handshake and the 802.1X Controlled port is opened and allows direct communication with the backend network.
At least in the ideal world that is how it works.
After many years at this, it is quite rare to see, that both the STA and Authentication server verify those keys perfectly. More often than not, companies do not have their own PKI and are using trusted third-party certificates for this. Let me tell you the issue with this.
During the handshake, you are only verifying the certificate. Unlike in a web browser, you are verifying that the common name included within the certificate, matches the website you are on. WiFi does not have a common name. In essence, you are only checking if the certificate is valid. You are not verifying authenticity of the service you interacting with.
Now, lets pretend, that this is an ideal world. The reviewed network is actually using their own internal CA and everything is verified 100% perfectly. Most penetration testers would stop here. The scope of work, is to review this network.
But what if I told you, there is plenty more you can do. Yes, your scope of work is to review that network, and that might be rolled out flawlessly. But, the security boundary of that network does not stop there.
With all of that in mind, lets see what we can do.
Every device that ever connects to that perfect EAP-TLS network, is also a target. Every device, that connects to that network, is probably also mobile, and those devices, are probably used at peoples homes, at coffee shops, or dare I say it, free airport WiFi.
Once those devices connect to another network, the security boundary grows and opens a new avenue for attack. This is because, whether you know it or not, your device will send out probe requests on a regular basis. Even if you are already connected to a network, your device will likely still be seeking other networks constantly.
In a hypothetical scenario, lets say the device is connected to their homes network. They use their default ISP Thomson router, with all of the default settings, because who really changes the “secure” defaults right?
Lets play out this scenario!
You are sat in your clients’ coffee shop at 07:30 before staff start their day. You use your monitor mode enable Alfa WiFi adapter and quickly check the available networks. One catches your eye, it has an eSSID of AxisSecure and its configured with EAP-TLS.
To speed things up, instead of potentially having to generate a second key, you decide to use Lets Encrypts’ Certbot to generate us a legitimate third-party signed certificate to use with an evil twin network. Your plan, is to set up an evil twin network, of the AxisSecure using EAP-PEAP, in hopes of capturing some credentials.
By 08:00, everything is set up and we decide to use the software rogue, to conduct our evil-twin rogue access. We load our trusted third-party Lets Encrypt certificates into the rogue command line and set up the AxisSecure evil-twin.
At approximately 08:15, we have seen 20 connection attempts. All identities we capture are “anonymous” and none of the connection attempts trusted our certificate.
By 10:30, still no device trusted our certificate and we are at a loss for words. Not once, ever has this happened.
So we shutdown our evil-twin, enable monitor mode and just watch the airways, and capture every probe request we can.
We see the same thing AxisSecure, AxisBYOD and Thomson.
You decide that as Thomson is a generic ISP router, it is likely to also have a generic, numeric password. What if we set up that network? After all, what do we have to lose?
We launch rogue again, this time using WPA2 personal, and set the password to be “test test” just so that is it compliant with password requirements for a PSK.
Almost immediately, we get a message within rogue that says wlan0: AP-STA-POSSIBLE-PSK-MISMATCH
You decide to check our logs, and see that rogue sent the M1 EAPOL frame and the STA sent the M2 EAPOL frame.
The STA did not use “test test” as the PSK for the Thomson SSID, but that does not matter. Let’s quickly explain how the 4-way handshake works, and why, we are actually excited that the auth failed on us.
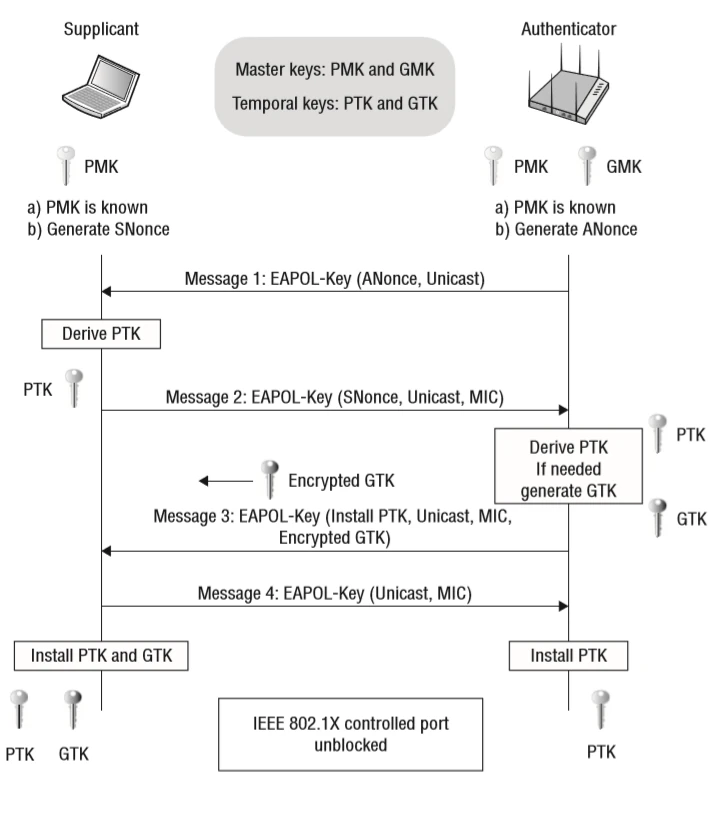
Firstly, the 4-way handshake, is a form of mutual authentication. Both the STA and AP verify that each other knows the PSK, without ever transmitting the PSK.
The M1 EAPOL frame is sent to the STA and contains an ANonce generate from the AP.
The STA then generates the M2 EAPOL frame and includes its own SNonce and appends the Message Integrity Code (MIC) over the contents of the M2 EAPOL frame using the Pairwise Transient Key and sends this back to the AP.
For us to attack PSK, all we need is the M1 and M2 frames. In a nutshell, the M1 and M2 EAPOL frames are the STA proving to the AP that is knows the PSK. The M3 and M4 EAPOL frames are the AP proving to the STA that it knows the same password.
So as the attacker, we don’t care what password we set, we just want to capture the M1 and M2 frames and crack them.
Now thats covered, we convert the pcapng file containing a single Beacon frame from our AP and the M1 and M2 EAPOL frames using hcxpcapngtools and just the default rockyou wordlist at the hash.
After several minutes, hashcat quits, telling us the password was “1234567890” so we had success there.
We set up the exact same rogue access point again, this time with the cracked password. Now when the STA attempts to connect to us, we get no error message at all. The STA has now connected to our network, which by the way, is providing an internet connection.
As we are a little mischievous here, we also decide to port scan the connected device.
We quickly realise, the client has done a fantastic job with their standard build configuration. They have properly configured the default Windows Defender Firewall, to block all incoming connections. Now What? Did the client win? Not yet! Still more to do!
While blocking all incoming connections is a common, and very default configuration for host based firewalls, what about outbound connections? Does the device look for anything?
You decide to open Wireshark on the same interface as our AP.
The network is very very busy. You immediately notice a barrage of mDNS and LLMNR broadcast requests. So, the STA has a properly configured inbound firewall, and is not blocking outbound traffic, this is how we win!
If you have ever been on an internal penetration test before, you know exactly where this is going. Otherwise, come along for the ride.
So now, we can get to the good, for those unaware, lets introduce a tool of any penetration testers arsenal, Responder.
The tool does exactly what the name suggests it does, it responds. Those broadcast mDNS (Multicast Domain Name System) and LLMNR (Link-Local Multicast Name Resolution) requests, are actually legacy or backup name resolution methods. The are looking for something. What responder does is very simple, yet very powerful, it merely responds saying “Yes I’m over here!”
When a Microsoft Windows based computer connects to a network, one of the first things it will do, is try and reconnect to any network shares or drives that it had previously. It does this by first sending out requests over modern protocols. When nothing responds to these, it then uses these legacy protocols, which typically are not verified. As the Windows operating system is very helpful, as soon as it get a response, it will automatically attempt to authenticate with the network share.
In the backend, Windows has just attempted to authenticate with our Responder instance. Windows has sent the accounts NetNTLM authentication hash to us.
Now, we cannot replay this NetNTLM hash, so again, we will have to hope and pray the we have a good wordlist. So lets use rockyou again this time, with the password cracker John The Ripper.
Once the password is cracked, you still cannot auth to the enterprise network, because they are enforcing EAP-TLS, which does not support authentication via credentials. So there are a couple of options here, attack the client some more, do whatever it takes to “steal” the certificate from the device. This sounds like alot of work.
So instead, because everything is moving to the cloud anyway, you attempt to log into office.com with your newly acquired user authentication credentials, hoping that MFA is not active.
And boom! You have access to Outlook web access, and you find the Outlook public folders.
Wireless Pivot Attack Chain Overview
[Corporate Wi-Fi Device]
     ↓
[Auto-connects to Rogue Home SSID]
     ↓
[Broadcasts mDNS/LLMNR/NetBIOS queries]
     ↓
[Responder captures NetNTLM hash]
     ↓
[Crack hash → Retrieve internal credentials]
Defensive Takeaways
- Properly configure client Wi-Fi profiles:
- Disable automatic reconnection.
- Use certificate pinning where possible.
- Limit broadcast protocols:
- Disable mDNS, LLMNR, and NetBIOS where not needed.
- Harden mobile devices:
- Apply outbound firewall rules.
- Use VPNs that auto-enable on untrusted networks.
- Rotate passwords and use MFA:
- Even if an NTLM hash is cracked, MFA can save you.
Conclusion
Even the most secure enterprise networks are only as strong as the endpoints that use them. Wireless pivots exploit trust, mobility, and misconfigurations to breach secure environments through invisible vectors.
So the next time someone says, “We use EAP-TLS, we’re secure,” just smile. Because now you know better.
Stay sneaky.
Want to Master This?
If this kind of attack flow excites you—pivoting from probe requests to password hashes—then you’ll love my Wireless Mastery Training Course.
- Hands-on labs
- Real-world scenarios
Whether you’re new to wireless hacking or sharpening your red team skills, this course is built to turn you into a threat.
Check it out here: https://training.thexero.co.uk/wireless-mastery (Bring coffee. You’ll need it.)